提醒:本文最后更新于 2629 天前,文中所描述的信息可能已发生改变,请谨慎使用。
VeryNginx 是一个功能强大而对人类友好的 Nginx 扩展程序,这是作者的原话。很久之前我就看到过这个项目,直到最近我才在本站试用了一把,确实好用,于是想通过本文把它介绍给更多人。
VeryNginx 主要由两部分组成:基于 lua-nginx-module 开发的 Lua 脚本,以及基于 HTML/CSS/JS 开发的 Web 控制面板 —— 用于生成和管理 Lua 脚本所需配置。
lua-nginx-module 能让 Lua 脚本直接跑在 Nginx 内部,比用 C 语言开发 Nginx 模块更容易上手,同时还能充分利用 Nginx 的非阻塞 I/O 模型,非常适合开发功能复杂、性能优异的 Web 应用。它也是大家熟知的 OpenResty 套件中一个最核心的模块。
VeryNginx 通过在请求的不同阶段(如 init_by_lua*/rewrite_by_lua*/access_by_lua*/log_by_lua*)执行不同 Lua 脚本,实现给请求打标签及对拥有不同标签的请求进行不同的处理的功能。除此之外,它还支持常见的统计报表展示。
安装 VeryNginx
VeryNginx 依赖以下三个 Nginx 模块:
- lua-nginx-module
- http_stub_status_module
- http_ssl_module
如果对 Nginx 没有定制化需求,建议直接使用 VeryNginx 默认的安装脚本,它会同时装好 VeryNginx 自身和 OpenResty 套件,最为方便。具体步骤请查看官方文档。
对于我这样喜欢各种折腾 Nginx 的人来说,修改之前的 Nginx 编译步骤,把上面三个模块加进去,也不算复杂。具体步骤后面再介绍,先来搞定 VeryNginx 工具本身。
这一步很简单:下载 VeryNginx 最新版代码并安装即可:
wget https://github.com/alexazhou/VeryNginx/archive/v0.3.3.zip
unzip v0.3.3.zip

cd VeryNginx-0.3.3/
sudo python install.py install verynginx

cd ../
安装 VeryNginx 用到了 Python 脚本,但这个项目跟 Python 没有半毛钱关系,不信可以看下 install.py 中的 install_verynginx 方法,只做了拷贝文件和修改配置目录权限两件事。
VeryNginx 默认会被装到 /opt/verynginx/ 目录,本文使用默认配置。
编译 Nginx
VeryNginx 依赖的 http_stub_status_module 和 http_ssl_module 只需要在 configure 时加上就可以。lua-nginx-module 稍微麻烦一点,它有以下依赖:
- LuaJIT 2.0 或 LuaJIT 2.1(推荐)或 Lua 5.1(5.2 目前不支持);
- ngx_devel_kit(NDK);
- ngx_lua 源码;
下面分别来搞定它们。本文使用 Ubuntu 16.04.1 LTS,全部采用默认路径安装。如果你的环境跟我不一样,一些命令请自行调整。
LuaJIT
下载并安装 LuaJIT:
wget http://luajit.org/download/LuaJIT-2.1.0-beta2.zip
unzip LuaJIT-2.1.0-beta2.zip

cd LuaJIT-2.1.0-beta2/
make
sudo make install

cd ../
设置环境变量:
export LUAJIT_LIB=/usr/local/lib
export LUAJIT_INC=/usr/local/include/luajit-2.1/
ngx_devel_kit
下载并解压 ngx_devel_kit:
wget https://github.com/simpl/ngx_devel_kit/archive/v0.3.0.zip
unzip v0.3.0.zip
ngx_lua
下载并解压 ngx_lua:
wget https://github.com/openresty/lua-nginx-module/archive/v0.10.7.zip
unzip v0.10.7.zip
Nginx
本站编译 Nginx 的详细步骤,都记录在这篇文章,可以照搬。只有 configure 要改一下:
./configure --with-ld-opt="-Wl,-rpath,/usr/local/lib/" --add-module=../ngx_devel_kit-0.3.0 --add-module=../lua-nginx-module-0.10.7 --add-module=../ngx_brotli --add-module=../nginx-ct-1.3.2 --with-openssl=../openssl --with-http_v2_module --with-http_ssl_module --with-http_gzip_static_module --with-http_stub_status_module

make
#make install 前请务必停止已有 Nginx 服务,sudo /etc/init.d/nginx stop
sudo make install
编译并安装好 Nginx 之后,建议通过 -V 参数再次确认:
/usr/local/nginx/sbin/nginx -V

nginx version: nginx/1.11.7
built by gcc 5.4.0 20160609 (Ubuntu 5.4.0-6ubuntu1~16.04.4)
built with OpenSSL 1.0.2j  26 Sep 2016
TLS SNI support enabled
configure arguments: --with-ld-opt=-Wl,-rpath,/usr/local/lib/ --add-module=../ngx_devel_kit-0.3.0 --add-module=../lua-nginx-module-0.10.7 --add-module=../ngx_brotli --add-module=../nginx-ct-1.3.1 --with-openssl=../openssl --with-http_v2_module --with-http_ssl_module --with-http_gzip_static_module --with-http_stub_status_module
配置 VeryNginx
在 Nginx 中引入 VeryNginx 的配置文件,就可以让 VeryNginx 工作起来。首先要修改的是 Nginx 的主配置,一般位于 /usr/local/nginx/conf/nginx.conf。
在主配置文件的最外层,加入以下配置:
include /opt/verynginx/verynginx/nginx_conf/in_external.conf;
在主配置的 http 段落中,加入以下配置:
include /opt/verynginx/verynginx/nginx_conf/in_http_block.conf;
在具体站点配置的 server 段落中,加入以下配置:
include /opt/verynginx/verynginx/nginx_conf/in_server_block.conf;
加完之后,建议通过 -t 参数确保配置无误:
/usr/local/nginx/sbin/nginx -t
如果提示 test is successful,说明配置无误,可以重启 Nginx 服务;否则请根据提示排查。
如果一切顺利,访问 http://yourdomain.com/verynginx/index.html 就可以见到 VeryNginx 的 Web 控制面板。默认用户名和密码都是 verynginx,登录后请务必修改。
使用示例
VeryNginx 使用非常简便,基本上不需要做过多说明。只是有一点需要注意:在 Web 控制面板中对任何配置项进行增删改之后,在点击页面右下角「Save」按钮之前并不会生效;点击「Reload」可还原到上一次配置。
VeryNginx 可以根据多种特征(Client IP、Host、UserAgent、URI、Referer、Request Args)来组合出不同的规则,用来给请求打上标记(Matcher);可以给拥有不同标记的请求指定不同的处理动作(Custom Action)。
下面通过一个实际案例来演示 VeryNginx 的基本用法。
最近我发现某搜索引擎对本站的索引中,有大量重复内容(一共索引了 5000 多条记录,其他搜索引擎都只有几百):

一般来说,并不是说搜索引擎收录的页面越多越好,相反如果收录的不同 URL 都指向了同样的内容,很可能被判作弊,从而导致站点被降权。
从访问日志中,可以看到这家搜索引擎在大量抓取本站首页,并带上了一个无意义的 p 参数:
106.120.173.72 - - [10/Dec/2016:05:50:43 +0800] "GET /index.html?p=142&pn=7 HTTP/1.1" 200 6098 "-" "Sogou web spider/4.0(+http://www.sogou.com/docs/help/webmasters.htm#07)" 0.007 0.007
106.120.173.72 - - [10/Dec/2016:05:50:53 +0800] "GET /index.html?p=134&pn=1 HTTP/1.1" 200 4793 "-" "Sogou web spider/4.0(+http://www.sogou.com/docs/help/webmasters.htm#07)" 0.007 0.007
106.120.173.72 - - [10/Dec/2016:05:51:03 +0800] "GET /index.html?p=94&pn=1 HTTP/1.1" 200 4793 "-" "Sogou web spider/4.0(+http://www.sogou.com/docs/help/webmasters.htm#07)" 0.006 0.006
本站没有使用 p 参数,这样会导致 Spider 抓取的页面虽然 URL 不一样,但内容完全一样,从而导致大量重复索引。如果是 Google 出现这种情况,可以通过 Google Webmaster 告诉 Spider 忽略指定参数。但这家搜索引擎的站长平台我一直无法认证成功,所以这条路不通。
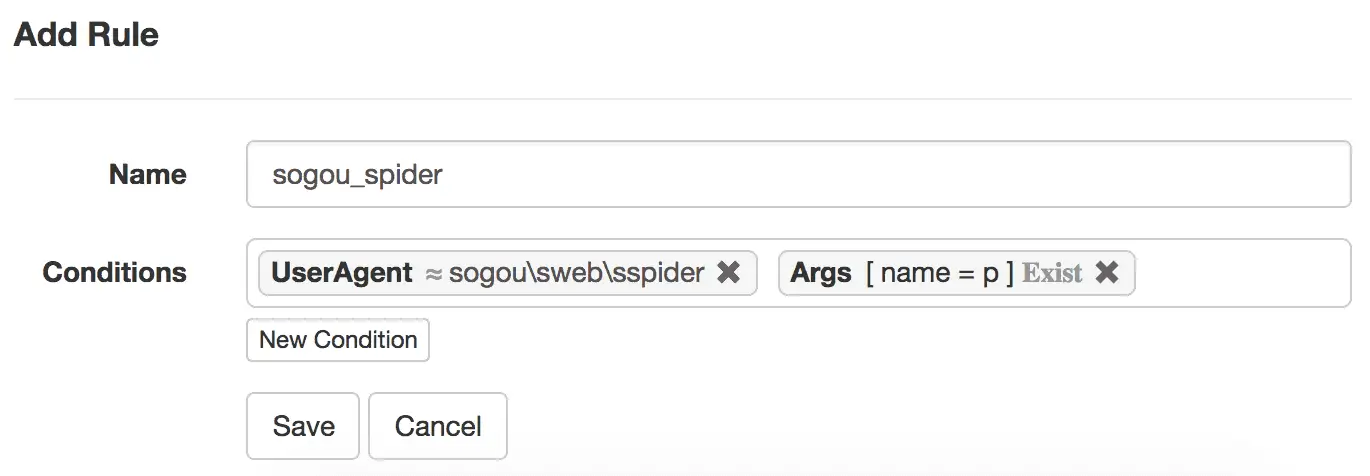
有了 VeryNginx,这种情况就很好处理了。首先通过 UserAgent 是否包含关键字、请求中是否存在 p 参数两个条件,对流量进行标记:
然后使用「Filter」这个 Custom Action,直接将拥有这个标记的流量响应为 404:
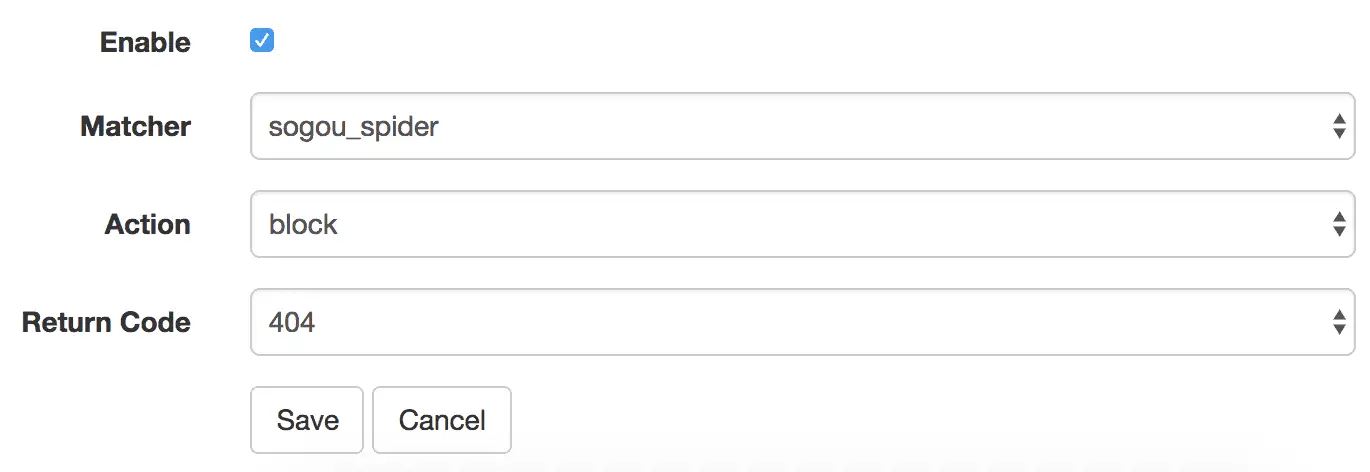
在 Web 控制面板保存配置后,立即生效。马上来测试一下:
curl -I -H'User-Agent: Sogou web spider/4.0(+http://www.sogou.com/docs/help/webmasters.htm#07)' 'https://mailseason.com/?p=95&pn=17'

HTTP/1.1 404 Not Found
Server: nginx
... ...
是不是很棒!通常,如果搜索引擎发现某个网址多次无法访问,就会从将其从索引库及 Spider 抓取列表中移除。
可以看到,使用 VeryNginx 对特定流量进行标记和干预,比直接修改 Nginx 配置方便得多,也强大得多。除了前面演示的「Filter」之外,VeryNginx 还提供了「Scheme Lock、Redirect、URI Rewrite、Browser Verify、Frequency Limit」这几个 Custom Action,其中「Browser Verify」可以用来验证发起请求的客户端是否支持 Cookie 或者 JavaScript,达到防 CC 攻击的目的。
大家都知道,我特别关注本站的访问速度。经过这段时间的试用,VeryNginx 在请求处理和内存占用上的表现,都令人满意。
本文就写到这里,如果想要了解 VeryNginx 更多细节,推荐查看官方文档。
本文链接:https://mailseason.com/post/use-verynginx.html,参与评论 »
--EOF--
发表于 2016-12-10 23:35:53 ,并被添加「 Nginx 」标签 ,最后修改于 2017-02-06 14:50:29 。查看本文 Markdown 版本 »
提醒:本文最后更新于 2629 天前,文中所描述的信息可能已发生改变,请谨慎使用。
专题「Web 服务器」的其他文章 »
- 本博客开始支持 TLS 1.3 (Aug 06, 2017)
- HTTPS 常见部署问题及解决方案 (Dec 12, 2016)
- 开始使用 ECC 证书 (Aug 27, 2016)
- 为什么我们应该尽快升级到 HTTPS? (May 16, 2016)
- 本博客 Nginx 配置之完整篇 (Mar 21, 2016)
- 从无法开启 OCSP Stapling 说起 (Mar 13, 2016)
- Certificate Transparency 那些事 (Feb 03, 2016)
- Let's Encrypt,免费好用的 HTTPS 证书 (Dec 25, 2015)
- 从 Nginx 默认不压缩 HTTP/1.0 说起 (Dec 15, 2015)
- TLS 握手优化详解 (Nov 08, 2015)
Comments